Cisco UCME BE4000 UC500 - RADIUS
These instructions help you configure your Cisco UCME / BE4000 / UC500 - RADIUS phone system to work with TIM Plus. Contact your system maintainer if you are not familiar with the configuration of your PBX.
Support files
Ensure the following support files exist in the /config/ folder of the TIM Plus application:
Cisco UCME - RADIUS.TDT
Cisco UCME - RADIUS.TDS
Contents
- Configure Cisco AXL sync
- Configure UCME to send RADIUS events
- Configure TIM Plus to capture RADIUS packets
Configuring Cisco AXL sync
Follow the steps below to configure TIM Plus to perform directory synchronisation with your Cisco UCME:
- Click on the
Directorytab. - If you don't have a site set up, press
Addand selectPBXfrom the drop-down menu. In the dialogue window, name your site and then selectAdd. - Locate the site object you want to configure in the Directory, click on it and select
Properties. - In the Site Properties window, select the
Synctab. - Tick the option entitled Synchronise with the following device .
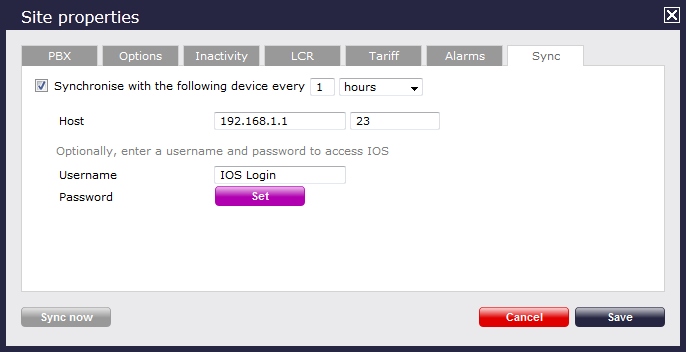
- In the Host field, enter the IP address of your UCME.
- In the Port field, enter the port number of the IOS service, e.g. 23 .
- In the Username field, enter the username of the IOS login that can perform synchronisation.
- Click on the
Setbutton and enter the password of the IOS login that can perform synchronisation. - Click on the
Savebutton to apply the changes.
Configuring UCME to send RADIUS events
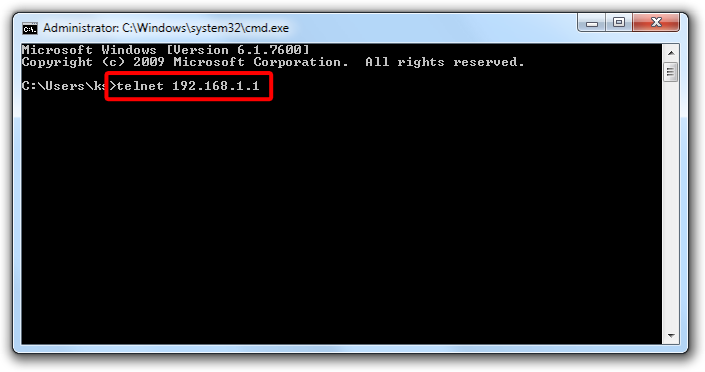
Use Telnet to connect to the IP address of your UCME as shown below:
Single site configuration
Enter the following commands to enable the UCME to send RADIUS events to TIM Plus:
| Step | IOS commands | Description |
|---|---|---|
| 1 | enable | Causes the UCME to enter EXEC mode. Type your EXEC password if requested |
| 2 | conf t | Enters the global configuration mode |
| 3 | aaa new-model | Enables aaa accounting mode |
| aaa accounting connection h323 start-stop group RADIUS | ||
| gw-accounting aaa | ||
| acct-template callhistory-detail | ||
| 4 | RADIUS-server host 192.168.0.1 auth-port 0 acct-port 1612 | Specifies the IP address and port of TIM Plus's RADIUS, to which CDR data will be sent, e.g. 192.168.0.1:1612 |
| 5 | RADIUS-server key C1sco | Specifies a RADIUS authentication secret that will be used by TIM Plus (configured in the next section), e.g. C1sco |
| 6 | RADIUS-server vsa send accounting | Enables VSA events |
| 7 | end | Exits configuration mode |
| 8 | wr | Saves the changes |
Multi-site configuration
If you need to send the data to more than one server, such as TIM Plus and UCC server for example, you can set up multiple RADIUS connections in the phone system. To configure a multi-site system, follow the steps below:
Replace SITE_NAME with a unique name for the destination RADIUS information. Replace SITE_IP with the IP address of the RADIUS server. Replace SITE_KEY with the secret you want to assign to that specific site.
| Step | IOS Commands | Description |
|---|---|---|
| 1 | enable | Causes the UCME to enter EXEC mode. Type your EXEC password if requested |
| 2 | conf t | Enters the global configuration mode |
| 3 | aaa new-model | Enables aaa accounting mode |
| 4 | aaa accounting update newinfo | |
| 5 | radius-server vsa send accounting | Enables VSA events |
| 6 | gw-accounting aaa | Enables aaa accounting |
| acct-template callhistory-detail | ||
| exit | ||
| 7 | radius server SITE_NAME | Configures the call accounting for each separate site |
| address ipv4 SITE_IP acct-port 1612 | Specifies the IP address and port of TIM Plus's RADIUS, to which CDR data will be sent, e.g. 192.168.0.1:1612 | |
| key SITE_KEY | Specifies a RADIUS authentication secret that will be used by TIM Plus (configured in the next section), e.g. C1sco | |
| exit | Exits current site configuration |
Repeat step 7 for each individual site
| Step | IOS Command | Description |
|---|---|---|
| 8 | aaa group server radius SITE_NAME | Configures a specified aaa server group |
| server name SITE_NAME | Specifies a RADIUS server to use for this aaa group | |
| exit | Exits current site configuration |
Repeat step 8 for each individual site
| Step | IOS Command | Description |
|---|---|---|
| 9 | aaa accounting connection h323 | Configures the aaa connection information |
| action-type start-stop | Setting the action type will send RADIUS information when the call starts and stops | |
| broadcast | Enabling broadcast means that all the aaa groups will be sent RADIUS data | |
| 10 | group SITE_NAME | Specifies the aaa group(s) that the accounting system will send RADIUS data to |
Repeat step 10 for each system
| Step | IOS Command | Description |
|---|---|---|
| 11 | end | Exits configuration mode |
| 12 | wr | Saves the changes |
For a system with five or more RADIUS servers, it is recommended to amend the server retransmit options in the UCME, in order to reduce the stress on the phone system.
IP radius source-interface
To force RADIUS to use the IP address of a specified interface for all outgoing RADIUS packets, use the ip radius source-interface command in global configuration mode. If you don't wish to use the IP address of a specified interface, use the no form of this command.
| Step | IOS Command |
|---|---|
| 1 | ip radius source-interface SUBINTERFACE_NAME |
| 2 | no ip radius source-interface |
Configuring TIM Plus to capture RADIUS packets
Follow the steps below to configure TIM Plus to receive RADIUS data from your UCME:
- Click on the
Directorytab. - Locate the site object you want to configure in the Directory, click on it and select
Properties.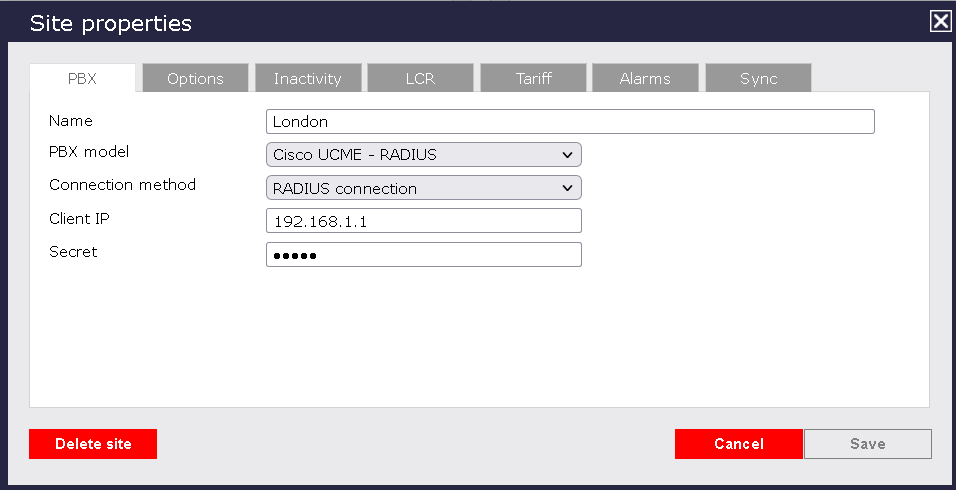
- In the Site Properties window, select Cisco UCME - RADIUS from the PBX model drop-down list.
- In the Connection method field, select RADIUS connection from the drop-down list.
- In the Client IP field, enter the IP address of your UCME.
- In the Secret field, enter the RADIUS-server key you configured on your UCME in the section above, e.g. C1sco.
- Click on the
Optionstab and tick the Keep a local backup of any data tickbox, as shown below
- Click on the
Savebutton to apply the settings.